How to Enable Secure Boot on ASUS Motherboard
1. Introduction
1.1 Importance of Secure Boot
In the ever-evolving world of cybersecurity threats, enabling Secure Boot on your computer has become increasingly crucial. This security feature is designed to protect your system from malicious software and unauthorized code during the boot process, ensuring a safer and more secure computing experience.
1.2 Why Secure Boot is often disabled
Despite its importance, many new Windows 11 PCs arrive with Secure Boot disabled, which can be a significant inconvenience for users. Fortunately, enabling Secure Boot on ASUS motherboards is a straightforward process that can be completed in just a few minutes.
Steps to Enable Secure Boot on ASUS Motherboard
1. Entering BIOS/UEFI
- During Boot: Press Delete or F2 repeatedly as the PC starts.
- Via Windows Recovery Environment:
- Click Power in the Start menu, hold Shift, and click Restart.
- Go to “Troubleshoot” > “Advanced Options” > “UEFI Firmware Settings” > “Restart.”
2. Disabling Compatibility Support Module (CSM)
- Go to the “Boot” tab in BIOS/UEFI.
- Disable “Launch CSM” to enable UEFI mode.
- Note: Backup files and reinstall Windows if “Launch CSM” is enabled.
3. Enabling Secure Boot
- Go to the “Secure Boot” section in BIOS/UEFI.
- Set “Secure Boot State” to “User” or “Enabled.”
- Set “OS Type” to “Windows UEFI Mode.”
- Set “Secure Boot Mode” to “Standard.”
4. Configuring Secure Boot Options
- Key Management (if needed):
- Go to “Key Management.”
- Select “Install All Default Secure Boot Keys.”
- Save and Exit:
- Press F10 to save changes and exit.
- System reboots with Secure Boot enabled.
2. What is Secure Boot?
2.1 Definition
Secure Boot is a security feature that ensures that only trusted and digitally signed operating systems and software can be loaded during the boot process. It acts as a gatekeeper, verifying the integrity and authenticity of the code before allowing it to run.
2.2 Purpose of Secure Boot
The primary purpose of Secure Boot is to prevent malware, rootkits, and other malicious code from loading during the boot process, which can compromise the security and stability of your system. By ensuring that only trusted software is loaded, Secure Boot helps protect your computer from unauthorized access and potential attacks.
2.3 Requirements for Secure Boot
To enable Secure Boot, your computer must meet two key requirements:
- UEFI BIOS Mode: Your system must be configured to use the Unified Extensible Firmware Interface (UEFI) BIOS mode, which replaces the traditional BIOS and provides a more secure and flexible boot environment.
- Secure Boot State: The Secure Boot state must be enabled in your BIOS/UEFI settings, allowing the system to verify the integrity of the boot process.
3. Checking Secure Boot Status
Before enabling Secure Boot, it’s essential to verify the current status of your system. Here are two methods to check the Secure Boot status:
3.1 Using System Information
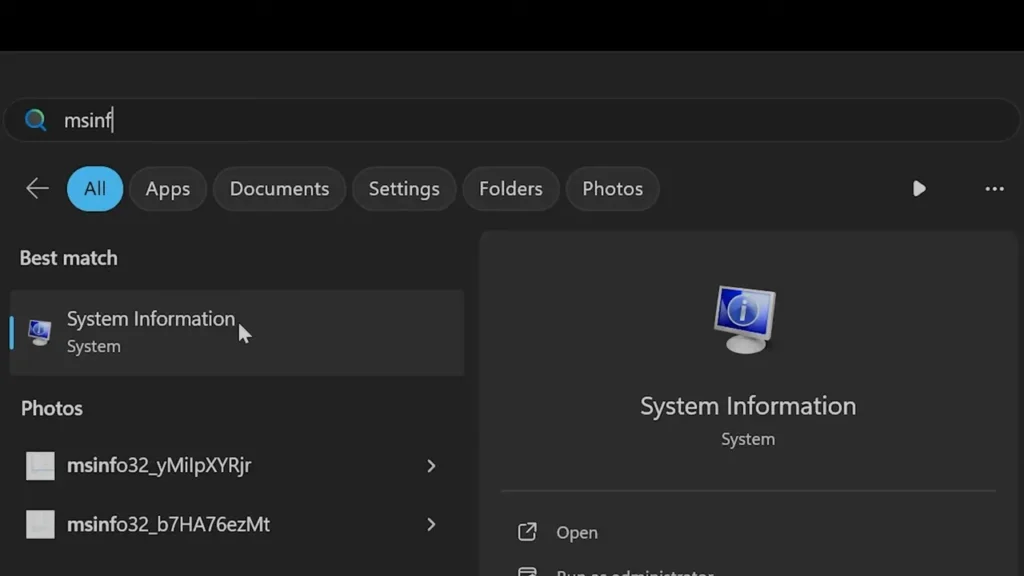
- Open the Start menu and search for “System Information.”
- Launch the System Information application.
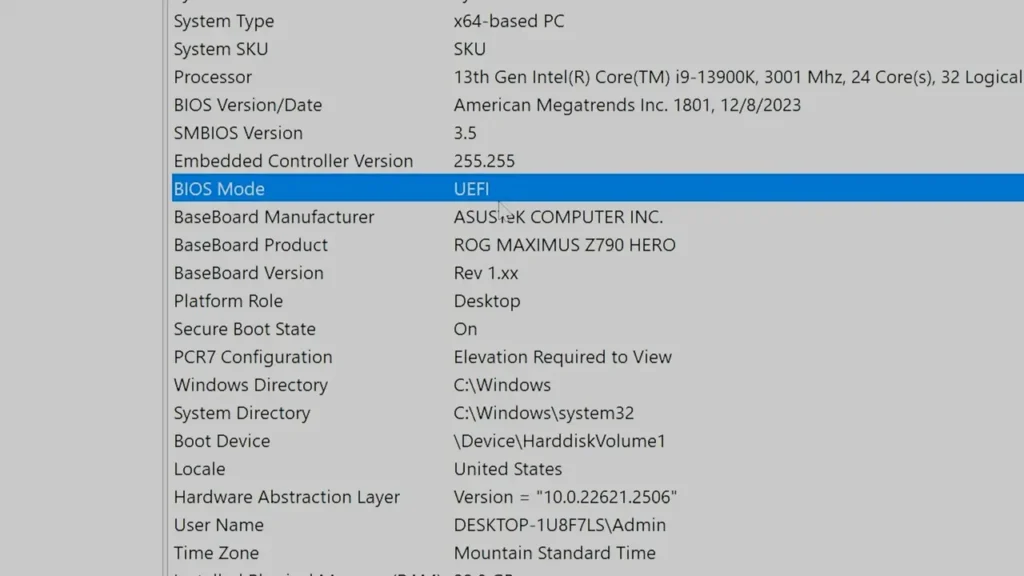
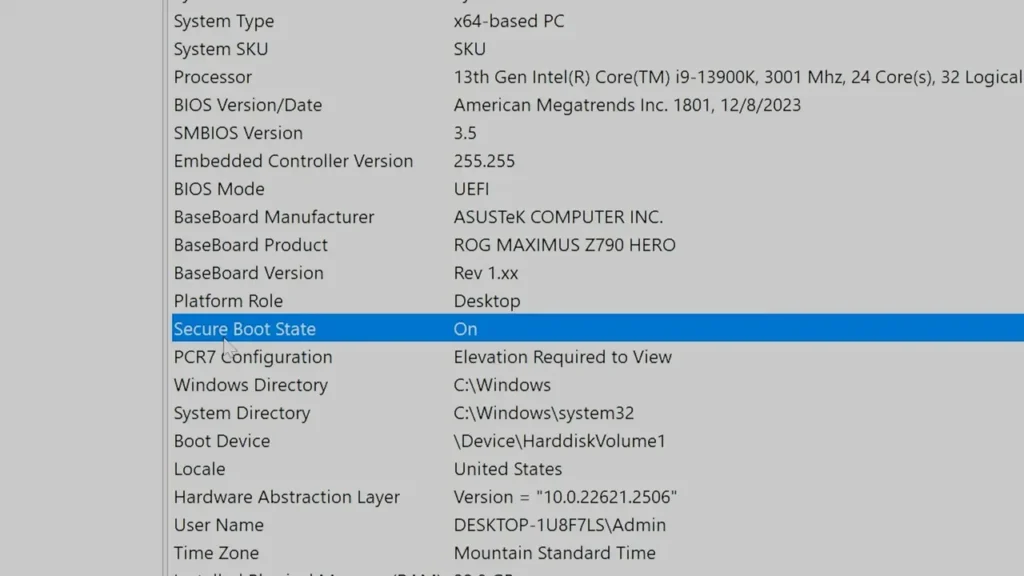
- In the System Information app, locate the “BIOS Mode” and “Secure Boot State” entries.
- If the BIOS Mode is set to “UEFI” and the Secure Boot State is set to “On,” your system meets the requirements for Secure Boot.
3.2 Using Windows Security
- Open the Start menu and search for “Windows Security.”
- Launch the Windows Security application.
- Navigate to the “Device Security” section.
- If Secure Boot is enabled, you’ll see a message stating, “Secure Boot is on, preventing malicious software from loading when your device starts up.”
- If Secure Boot is not enabled, there will be a line indicating that “Standard Hardware security is not supported.”
3.3 Checking BIOS Mode
While Windows Security can confirm the Secure Boot state, it does not provide information about the BIOS mode. To ensure that your system is configured correctly, you’ll need to check the BIOS mode as well.
4. Enabling Secure Boot on ASUS Motherboards
4.1 Entering BIOS/UEFI
Before enabling Secure Boot, you’ll need to access the BIOS/UEFI settings on your ASUS motherboard. There are two ways to enter the BIOS/UEFI:
- During Boot: When your PC starts, press the Delete or F2 key repeatedly to enter the BIOS/UEFI setup.
- Through Windows Recovery Environment: In the Start menu, click the Power button and hold down the Shift key while clicking “Restart.” From the Recovery Environment, navigate to “Troubleshoot” > “Advanced Options” > “UEFI Firmware Settings” > “Restart.”
4.2 Disabling Compatibility Support Module (CSM)
Once in the BIOS/UEFI, locate the “Boot” tab and navigate to the “CSM (Compatibility Support Module)” option. Ensure that the “Launch CSM” setting is disabled to enable UEFI mode.
If the “Launch CSM” option is enabled, you’ll need to back up your important files and reinstall Windows, as changing this setting will prevent your system from booting into the current Windows installation.
4.3 Enabling Secure Boot
After disabling CSM, navigate to the “Secure Boot” section in the BIOS/UEFI. Ensure that the “Secure Boot State” is set to “User” or “Enabled.” Additionally, the “OS Type” should be set to “Windows UEFI Mode,” and the “Secure Boot Mode” should be set to “Standard.”
4.4 Configuring Secure Boot Options
Depending on your ASUS motherboard and CPU generation, you may need to take additional steps to configure Secure Boot options:
- Key Management: On some ASUS motherboards, you’ll need to navigate to the “Key Management” section and select “Install All Default Secure Boot Keys.” This will load the default Secure Boot keys required for a secure boot process.
- Save Changes and Exit: After making the necessary changes, press F10 to save the BIOS/UEFI settings and exit. Your system will reboot with Secure Boot enabled.
5. Troubleshooting
5.1 BitLocker Considerations
If you’re using BitLocker, a full-disk encryption feature in Windows, you must disable it before proceeding with Secure Boot changes. Failing to disable BitLocker could result in data loss or prevent your system from booting correctly.
5.2 Recovery Mode for BIOS/UEFI Access
In some cases, you may not be able to access the BIOS/UEFI settings through the Recovery Environment if you have a customized or modified version of Windows. In such scenarios, resort to pressing the Delete or F2 key during the boot process to enter the BIOS/UEFI directly.
5.3 Reinstalling Windows
If you encounter issues after enabling Secure Boot or disabling CSM, you may need to back up your data and reinstall Windows. Ensure that you have a bootable Windows USB drive or installation media ready before proceeding with this step.
6. Conclusion
Enabling Secure Boot on your ASUS motherboard is a crucial step in enhancing the security and integrity of your system. By following the steps outlined in this article, you can easily configure Secure Boot and protect your computer from malicious software and unauthorized code during the boot process. Remember to exercise caution when making changes to BIOS/UEFI settings and always back up your important data before proceeding.
FAQs
Why is Secure Boot important?
Secure Boot is essential for protecting your computer from malware, rootkits, and other malicious code that could compromise your system during the boot process. By verifying the integrity and authenticity of the code before allowing it to run, Secure Boot helps ensure that only trusted software is loaded, enhancing the overall security of your system.
Can I enable Secure Boot on older ASUS motherboards?
Yes, you can enable Secure Boot on older ASUS motherboards, but the process may vary slightly depending on the specific model and BIOS/UEFI version. Some older motherboards may not have the “Secure Boot Mode” option, but you can still enable Secure Boot by configuring the “Secure Boot State” and loading the default Secure Boot keys.
What should I do if I can’t access the BIOS/UEFI settings?
If you’re unable to access the BIOS/UEFI settings through the Recovery Environment or during the boot process, you may need to check your motherboard’s documentation or consult with ASUS support for specific instructions on how to enter the BIOS/UEFI on your particular model.
Can Secure Boot cause compatibility issues with certain software or hardware?
In some cases, Secure Boot may cause compatibility issues with older hardware or software that is not digitally signed or verified. If you encounter such issues, you may need to temporarily disable Secure Boot or explore alternative solutions to ensure compatibility.
What happens if I accidentally disable Secure Boot after enabling it?
If you accidentally disable Secure Boot after enabling it, your system may not boot properly or may display a warning message during the boot process. In such cases, you’ll need to re-enter the BIOS/UEFI and enable Secure Boot again to restore the secure boot process.
By following the steps outlined in this article and addressing any potential issues or compatibility concerns, you can successfully enable Secure Boot on your ASUS motherboard and enjoy a more secure and protected computing experience.
FURTHER READING


Car rental is the best choice for traveling, unlimited possibilities.