Understanding Durotech Construction Basics
Construction projects come with a mix of excitement and headaches, especially when aiming for longevity. It’s easy to focus on framing, roofing, and plumbing while forgetting how critical moisture barriers can be in a durotech construction timeline. These layers can quietly save you from costly repairs down the road. But have you ever wondered if that barrier is doing its job when the rain starts pouring?
That moisture barrier is the unsung hero that keeps foundations dry and walls mold-free. By choosing the right membrane and checking seams regularly, you stay ahead of water damage and unexpected expenses. Learning how these components work with the rest of your build helps you make informed choices. You’ll feel confident in your project plan and avoid surprises when the weather turns.
Project Planning Essentials
Planning a durotech construction project starts well before you break ground. You need to define the project scope and goals clearly. That means mapping out rooms, load points, and access routes on paper or with software. Early site surveys and soil tests help you spot hidden issues. Gathering these details now saves time and money later.
Once you have the basics, build a realistic timeline. Assign deadlines for design approval, permit filings, material orders, and inspections. Share this plan with contractors, architects, and stakeholders. Clear communication prevents missteps when work moves into fast mode. Regular check-ins keep everyone on the same page.
Budgeting follows a similar path. List every key cost: excavation, concrete, steel, and finish work. Add a buffer of at least 10 percent for surprises like weather delays or price hikes. Research local supplier rates and compare quotes, so you stay in control of cash flow. A zero-surprise budget feels good at project close-out.
Risk management is part of planning too. Identify common hazards, such as soil shifting, rain interruptions, or utility conflicts. Then decide how to react. Maybe you build a temporary barrier or adjust your dry season window. By thinking ahead, you turn potential headaches into manageable tasks.
Digital tools can boost your planning as well. Simple project management apps track tasks, share files, and log progress. They let you attach photos from the site and tag action items for quick follow-up. A central dashboard shows status at a glance. That way, small issues don’t slip through the cracks.
For example, a mid-size commercial build used a shared online schedule to sync crane availability with concrete pours. That cut idle equipment time by 15 percent and kept the crew productive. Real-life wins like this make planning a clear asset, not just a paperwork step.
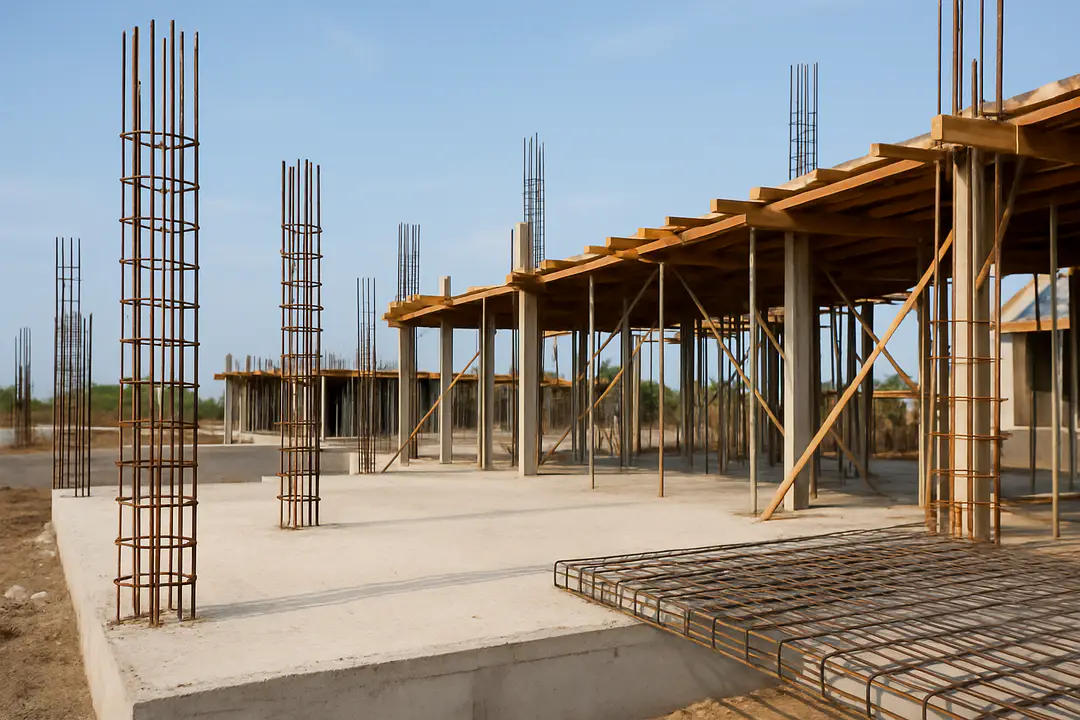
Foundation and Footing Tips
The foundation sets the tone for any durotech build. It must handle the load and resist moisture and shifting soil. Start by marking precise footings based on your plans. Use string lines and stakes to confirm exact spots. Level checks now avoid crooked walls later.
Follow these steps for strong footings:
- Site clearing: Remove debris and vegetation.
- Excavation: Dig to the right depth using a laser level.
- Formwork: Build sturdy wooden or metal mold boards.
- Reinforcement: Place steel rebar in a grid pattern.
- Concrete pour: Use the correct mix and vibration technique.
- Curing: Cover with plastic and keep moist for at least a week.
Soil tests guide your mix design. Sandy soil may require deeper footings or wider pads. Clay soils often need under-drain systems or gravel layers for drainage. Simple tweaks now avoid cracking or heaving later.
Don’t forget a vapor barrier under your slab. A heavy-duty plastic sheet stops ground moisture from rising into your flooring. Combine this with a compacted gravel layer for extra drainage. These simple layers take minutes to install but save years of repair bills.
Always check local codes for depth and reinforcement rules. An inspector may require extra steps, like footings on piers or tie beams. Early sign-offs keep your schedule on track. Once your base is set, the rest of the structure stands tall and secure.
Moisture Management Strategies
In a durotech construction setting, controlling moisture is vital to prevent mold and structural decay. A well-placed membrane can block water and allow your walls to breathe. Choosing the right product is often overlooked but makes a huge difference.
For example, advanced waterproofing solutions combine peel-and-stick membranes with liquid coatings. This dual approach seals joints and hard-to-reach edges. When installed correctly, it creates a continuous barrier that stands up to rain, floods, and ground moisture.
Key tips include checking overlaps, fastening seams tightly, and flashing around windows and doors. Always inspect the membrane before you pour concrete or install drywall. Once the surface is covered, finding a leak becomes costly and time consuming.
Proper grading around your site also diverts water away from the foundation. A slope of about 5 percent in the first ten feet is ideal. Gutters and downspouts should discharge at least three feet from the wall. Together, these measures work with your barrier to keep water outside where it belongs.
Inside, consider a sealed flooring system or a moisture-resistant drywall. These secondary defenses add another layer of protection. When specialists install both exterior and interior systems, your space becomes nearly impervious to damp. That level of detail separates an average build from a long-lasting one.
Durable Material Choices
Selecting materials in durotech construction involves balancing strength, cost, and longevity. You want products that resist wear but do not break the budget. Comparing options side by side can help you decide on the best fit for your project.
Here is a quick comparison of common materials:
| Material | Benefit | Drawback |
|---|---|---|
| Reinforced Concrete | High compressive strength | Heavier and slower to cure |
| Structural Steel | Excellent tensile strength | Prone to corrosion if unprotected |
| Engineered Wood | Eco-friendly and light | Needs moisture control |
| Fiber Cement Panels | Low maintenance | Higher material cost |
Coatings add a final layer of protection. Consider specialized construction coatings that resist UV rays and abrasion. These finishes extend the life of wood, metal, and concrete surfaces. They also improve appearance with custom colors and textures.
Insulation is another critical element. Closed-cell foam boards block heat flow and add rigidity. Fiberglass batts remain a budget-friendly choice but need a vapor barrier. New hybrid insulation products now combine both qualities for optimal performance.
For fasteners and connectors, choose galvanized or stainless steel. They prevent rust and slot neatly into modern framing systems. Proper selection here means fewer callbacks for repairs. In the end, durable materials make your structure safer and your clients happier.
Equipment and Technology
Modern durotech construction relies on more than hammers and nails. From drones for site surveys to 3D scanners for precision layouts, technology speeds up work and reduces errors. Early adopters see real benefits in efficiency and quality control.
Scheduling tools help you organize crews, deliveries, and inspections. By linking calendars to material orders, you cut wait times. Teams know when to arrive and what they need. This level of coordination lowers idle hours and labor costs.
Equipment maintenance is just as important. Use the latest software updates for your fleet management systems. They track service intervals, fuel use, and operator logs. Well-maintained machines run longer and safer on the job.
Drones and laser scanners now feed into cloud-based models. You can check as-built conditions against your design files in real time. That virtual feedback loop helps spot framing errors or missing anchors before they become real problems.
On-site communication also gains from mobile apps and walkie-talkie integrations. Field teams share photos, annotate issues, and confirm task completion instantly. A simple photo of a coupler or a beam connection can keep work moving without costly site visits.
Ultimately, marrying smart tools with skilled labor sets a durotech project apart. It delivers accuracy, saves time, and builds a better finished product for everyone involved.
Conclusion
A successful durotech construction project flows from careful planning to the final coat of paint. By outlining clear goals, you set a roadmap that guides every decision. Strong footings and robust moisture barriers keep foundations solid and walls dry.
Choosing durable materials and protective coatings adds years to the structure’s life and reduces maintenance costs. Integrating modern equipment and technology further sharpens your competitive edge. When your team uses real-time data and well-maintained machines, you avoid delays and rework.
This cohesive approach ties all parts together. Each choice—from the vapor barrier under the slab to the galvanized fastener—matters. The small steps of quality control add up to big gains in safety and durability. Armed with these insights, you are ready to tackle your next durotech construction challenge.
Remember, success in durotech construction is not just about tools or materials; it’s about how they work together. A solid plan, strong foundation, and protective systems let you deliver projects on time and on budget. Use these practices to build confidence with clients and avoid unexpected costs. Now, roll up your sleeves and start laying the groundwork for a project that will stand the test of time.